Showing posts with label road. Show all posts

Sunday, May 3, 2015

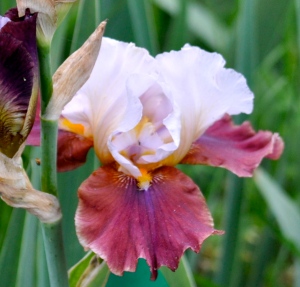
Now Blooming...Bearded Irises

With their swordlike leaves and showy flowers, bearded iris are an eye-catching addition to any garden. They're easy to plant, require minimum care, and readily multiply. Even if you grow nothing but bearded irises, you can enjoy a remarkable range of color and a bloom season extending for months. These perennials flourish in USDA Zones 3-9.
Bearded irises are identified by thick, bushy "beards" on each of the falls (lower petals) of the blossoms. The flowers are constructed with three upright "standard" petals and three drooping "fall" petals, which are often different colors. The falls may be "bearded" or not. 
Originally, most bearded irises were native to central and southern Europe. Some bearded irises are "rebloomers", blooming again in the summer, fall or winter. Additional water and fertilizer applied during the late spring and summer months encourages them to bloom again. There are rebloomers available which will perform in all but the coldest climates. Spring planting is discouraged but can be done under abnormal circumstances, however it often results in lack of bloom for a season or two and slow establishment.
Bearded iris need a balanced, well-drained soil but are very adaptable to a variety of soil types. Raised beds can help with drainage and are a MUST for areas with high rainfall. Iris, like most perennials, prefer neutral to slightly acidic soil (pH of 6.8 - 7.0 is ideal). Heavy clays need to be amended with gypsum or coarse sand to aid drainage. Iris can be mulched lightly (for winter protection and weed control) as long as the mulch does not cover the rhizome. Once winter is over, it is wise to remove the mulch.
PLANTING
Plant bearded iris in mid summer to early fall, spacing plants 1 to 2 feet apart, depending on variety. Excellent soil drainage is a must. Prepare garden bed by using a garden fork or tiller to loosen soil to a depth of 12 to 15 inches, then mix in a 2- to 4-inch layer of compost or bone meal. If planting a rhizome (fleshy root), dig a shallow hole 10 inches in diameter and 4 inches deep. Make a ridge of soil down the middle and place the rhizome on the ridge, spreading roots out to support the plant, replace the soil, firmly pack around the roots to remove air pockets and water liberally. In clay soil, the top of the rhizome should be exposed. In sandy soil, rhizomes can be buried with a thin layer of soil. If planting container-grown plants, set the plant so the rhizome is at the soil surface. Water thoroughly.
DO NOT plant bearded iris in a low area; they will not tolerate standing water. 14-18” is a good distance between rhizomes. For mass or clump style plantings, plant rhizomes in a triangular fashion about 6” apart.  In areas of intense summer heat or light soils, irises can be planted deeper (no more than 1” below the soils surface) to avoid scalding.
CARE
Apply a thin layer of compost around the base of plants each spring, leaving the rhizome (fleshy root) exposed. As flowers fade, cut back the flower stalks to the base of the plant, making sure to leave the fan leaves. To encourage a second bloom on reblooming varieties, promptly remove faded flowers and maintain consistent watering throughout the summer. In autumn, trim away dead foliage and prune back healthy leaves to a height of 4 to 5 inches. Once the soil has frozen, apply a layer of mulch to help prevent roots from heaving out of the soil during alternate freezing and thawing. If heaving occurs, don't try to force plants back into the soil. Instead, cover rhizomes and exposed roots with soil. Divide bearded iris every 4 to 5 years, preferably in late summer. Each division should have one or two leaf fans. Older rhizomes that have few white feeding roots should be discarded.
Specific fertilizer recommendations depend on your soil type, but bone meal, superphosphate and 6-10-10 are all effective. A light application in the early spring and a second light application about a month after bloom will reward you with good growth and bloom. Avoid using anything high in nitrogen, as nitrogen encourages rot problems.
We have and sell over 300 varieties of Bearded Irises growing in our gardens, with more being added this Fall.
If you enjoyed this article, want to know more about this or other related interesting topics, please like and share this article. Be sure to like us, so you don’t miss anything, we are Sweet Basil Farm & Gardens, on Facebook and other social media. We are a local producer of farm fresh fruits and vegetables and members of the American Poultry Association, licensed by the Georgia Dept. of Agriculture as Poultry Dealers and Brokers, and a proud member of the Georgia Grown program, a division of the Georgia Dept. of Agriculture. We also breed, sell and ship poultry, pet pigs, bearded irises and much more. We have an 80 acre working farm, putting great emphasis on all natural gardening and livestock management practices. An 1840s general store is situated on our property, and serves as our on-site farmer’s market. Conveniently located off of Interstate 75 near the Johnstonville Rd exit (#193).  We are six miles west, located in Barnesville, Lamar County, Georgia.
Special thanks to the American Iris Society and Better Homes and Gardensfor helpful information, as well as contributions from J. David Matthews, of Barnesville, Georgia in preparation of this article. Photo credits to Sweet Basil Farm & Gardens. DSC_0064
Fresh Asparagus Penne

Penne-Grilled-Chicken-Gorgonzola-Asparagus-42925Sweet Basil Farm's recipe of the week, using in season farm fresh ingredients.
INGREDIENTS
2 cups uncooked penne pasta
12 asparagus spears
12 cherry tomatoes
4 tablespoons extra-virgin olive oil
3/8 teaspoon kosher salt, divided
1/2 teaspoon black pepper, divided
1 tablespoon minced shallots
2 tablespoons fresh lemon juice
1 tablespoon Dijon mustard
1/2 tsp. of fresh, shredded rosemary, thyme and basil
4 crumbled bay leaves
1 1/2 teaspoons honey
1/2 cup pitted olives, halved
2 cups baby arugula
1/2 cup (2 ounces) crumbled goat or bleu cheese
2 lbs. of cooked, shredded chicken (Optional)
DIRECTIONS
1. Preheat oven to 400°.
2. Cook pasta according to package directions.
3. Place asparagus and tomatoes on a jelly-roll pan. Drizzle with 1 tablespoon olive oil; sprinkle with 1/4 teaspoon salt,1/4 teaspoon black pepper and herbs. Toss gently to coat; arrange asparagus and tomato mixture in a single layer. Bake at 400° for 6 minutes or until asparagus is crisp-tender. Remove asparagus from pan. Place pan back in oven, and bake tomatoes an additional 4 minutes. Remove tomatoes from pan; let asparagus and tomatoes stand 10 minutes. Cut asparagus into 1-inch lengths; halve tomatoes.
If you enjoyed this recipe, want to know more about this or other related interesting topics, please like and share this article. Be sure to like us, so you don’t miss anything, we are Sweet Basil Farm & Gardens, on Facebook and other social media. We are a local producer of farm fresh fruits and vegetables and members of the American Poultry Association, licensed by the Georgia Dept. of Agriculture as Poultry Dealers and Brokers, and a proud member of the Georgia Grown program, a division of the Georgia Dept. of Agriculture. We also breed, sell and ship poultry, pet pigs, bearded irises and much more. We have an 80 acre working farm, putting great emphasis on all natural gardening and livestock management practices. An 1840s general store is situated on our property, and serves as our on-site farmer’s market. Conveniently located off of Interstate 75 near the Johnstonville Rd exit (#193).  We are six miles west, located in Barnesville, Lamar County, Georgia.
Special thanks for helpful information, as well as contributions from J. David Matthews, of Barnesville, Georgia in preparation of this recipe.

Tips For Controlling Weed Growth

After all of the April showers, we will surely have May flowers...and weeds! Take preventative measures now, before they set their roots in to your flower bed. Sweet Basil has collected ideas below and has tried and tested. These ideas not only work, but are much easier (& safer!) than chemicals, blow torches, and even pulling!


LET SLEEPING WEEDS LIE

Kill weeds at their roots but leave the soil—and dormant weed seeds—largely undisturbed.
 
Every square inch of your garden contains weed seeds, but only those in the top inch or two of soil get enough light to trigger germination. Digging and cultivating brings hidden weed seeds to the surface, so assume weed seeds are there ready to erupt, like ants from an upset anthill, every time you open a patch of ground. Dig only when you need to and immediately salve the disturbed spot with plants or mulch. In lawns, minimize soil disturbance by using a sharp knife with a narrow blade to slice through the roots of dandelions and other lawn weeds to sever their feed source rather than digging them out. Keep in mind that weed seeds can remain dormant for a long, long time.
 
Some folks say it helps to turn your soil at night to control weeds. Research indicates that weeds may be stimulated to grow by a sudden flash of light, which is what you give them when you turn the soil over during the day. A German study concluded that by turning the soil at night, weed germination could be reduced by as much as 78 percent. You can try this method by working during a moonlit night, or at dawn or dusk.

MULCH, MULCH, MULCH

Don’t give weeds the chance to see the light. Whether you choose wood chips, bark nuggets, straw, or even pine needles, keep the mulch coming to smother out weeds.
 
Mulch benefits plants by keeping the soil cool and moist and depriving weeds of light. Organic mulches, in particular, can actually host crickets and carabid beetles, which seek out and devour thousands of weed seeds.
Some light passes through chunky mulches, and often you will discover—too late—that the mulch you used was laced with weed seeds. It’s important to replenish the mulch as needed to keep it about 2 inches deep (more than 3 inches deep can deprive soil of oxygen). In any case, you can set weeds way back by covering the soil’s surface with a light-blocking sheet of cardboard, newspaper, or biode­gradable fabric and then spreading prettier mulch over it.
If you choose to use this method on seldom-dug areas, such as the root zones of shrubs and trees, opt for tough landscape fabric for the light-blocking bottom sheet. There is a catch, however: As soon as enough organic matter accumulates on the landscape fabric, weed seeds dropped by birds or carried in on the wind will start to grow. For the bottom layer of fabric to be effective, these must be pulled before they sink their roots through and into the ground.
My favorite way to mulch is to lay newspaper down, wet it, then put down a thick layer of pine straw. I have found that nutsedge and a few other dreadful weeds do not grow as well with pine products. After mulching, using Preen or another pre-emergent is a good idea. It will save a lot of time and energy later. There is even an organic version.

WEED WHEN THE WEEDING’S GOOD

Young weeds go down much easier than older ones, so make the most of good weeding conditions.
 
The old saying “Pull when wet; hoe when dry” is wise advice when facing down weeds. After a drenching rain, stage a rewarding weeding session by equipping yourself with gloves, a sitting pad, and a tarp for collecting the corpses. As you head out the door, slip an old table fork into your back pocket because there’s nothing better for twisting out tendrils of henbit or chickweed. When going after bigger thugs, use a fishtail weeder or a flathead screwdriver to pry up taprooted weeds, like dandelion or dock.
Under dry conditions, weeds sliced off just below the soil line promptly shrivel up and die, especially if your hoe has a sharp edge. In mulched beds, use an old steak knife to sever weeds from their roots, then patch any open spaces left in the mulch.

LOP OFF THEIR HEADS

Chopping off weed heads feels good and you’ll reap short- and long-term benefits.
 
When you can’t remove weeds, the next best thing is to chop off their heads. With annual weeds, dead­heading buys you a few weeks of time before the weed “seed rain” begins. Cutting back the tops of perennial weeds, like bindweed, reduces reseeding and forces them to use up food reserves and exhaust their supply of root buds, thus limiting their spread.
You will need pruning loppers to take down towers of ragweed or poke, or you can step up to a string trimmer equipped with a blade attachment to cut prickly thistles or brambles down to nubs. No matter which method you choose, chopping down weeds before they go to seed will help keep them from spreading.

MIND THE GAPS BETWEEN PLANTS

Tightly planted beds leave no room for unwanted visitors.

WATER THE PLANTS YOU WANT, NOT THE WEEDS YOU’VE GOT

Drip irrigation is the way to go for a quick way to water your plants and not your weeds. Watering by hand works, too, but it’s often tedious.
 
Make sure to keep the edges of your garden mowed; this will help prevent a weed invasion.
If you have chickens or other poultry, goats, rabbits and even pigs, they would welcome the treat of hand picked weeds! Most weeds are full of nutrients that your animals need, especially if you can't let them free range. Most weeds are safe for animals, just do a google search to make sure the specific weeds you've pulled are safe.

HEAT IS THE KEY TO COMPOSTING WEEDS

Few experiences compare to the joy of watching weeds shrivel in the sun after a morning weeding session, but then what should you do with them? Their best resting place, of course, is a compost pile or bin, which is the end of the story if the weeds going in are free of seeds. In reality, however, a good half of the weeds you pull probably hold seeds. Separating the seedies from other weedies is impractical, so weed seeds in compost are customarily killed by raising the temperature in the heap.
Keep it hot. Running a hot heap calls for precise mixing and remixing of materials. Rather than struggle to heat up a heap that wants to run cold, I suggest waiting until a weedy heap reaches a nearly rotted state to set things right. From there, you can solarize small batches of moist compost in black plastic nursery liners that are enclosed in clear plastic bags and placed in the sun for two to three days.
Now you’re cooking. Easier than solarizing, plug in an old Crock-Pot outdoors, turn it to its lowest setting, and warm batches of compost while you sleep (three hours at 160°F kills most weed seeds).
Heat treating weedy compost destroys many of the microscopic life-forms that give compost its punch, so it’s a good idea to reprocess cooked compost for two to three weeks before using it in the garden. Place it in a plastic storage bin with a handful of earthworms borrowed from your garden and it will soon be laced with humic acids and other plant-pleasing compounds.
If you enjoyed this article, want to know more about this or other related interesting topics, please like and share this article. Be sure to like us, so you don’t miss anything, we are Sweet Basil Farm & Gardens, on Facebook and other social media. We are a local producer of farm fresh fruits and vegetables and members of the American Poultry Association, licensed by the Georgia Dept. of Agriculture as Poultry Dealers and Brokers, and a proud member of the Georgia Grown program, a division of the Georgia Dept. of Agriculture. We also breed, sell and ship poultry, pet pigs, bearded irises and much more. We have an 80 acre working farm, putting great emphasis on all natural gardening and livestock management practices. An 1840s general store is situated on our property, and serves as our on-site farmer’s market. Conveniently located off of Interstate 75 near the Johnstonville Rd exit (#193).  We are six miles west, located in Barnesville, Lamar County, Georgia.
Special thanks to Fine Gardening (finegardening.com) and almanac.com, as well as contributions from J. David Matthews, of Barnesville, Georgia in preparation of this article.