Showing posts with label perennial garden. Show all posts

Saturday, June 20, 2015

Daylilies....A Southern Garden Must Have!

images-5It's that time of year where the daylilies are the showoffs of the garden. Daylilies (Hemerocallis) are a very common perennial in the South. The heirloom or native daylilies grow wild in ditches, railroad tracks and in beds placed lovingly by gardeners long ago. They propagate very easily through division and are a prime starter plant for people who don’t have a green thumb, as well as those interested in learning how to hybridize plants.
Unknown-10Daylily Division
To divide a daylily, just dig up the clump and rinse the roots off. Dig a few inches around the diameter of the foliage. You can then see where the plant can be easily spilt, by looking at the root system. Each little bulbular tuber will be a new plant. Gently pull apart the tubers/roots and the top growth. The last step it to replant it, add your compost or fertilizer and you're done!
images-3Care 
Daylilies are extremely tough plants and require very little maintenance. They like full sun, so plant them in a sunny spot for all to enjoy!
Daylilies need water. Not only do weeds detract from the visual beauty of your garden, but they compete with daylilies for water. This is especially important in times of low rainfall. A simple fact- weeds use a tremendous amount of moisture, in addition to competing for nutrients and sunlight.
Some daylily hobbyists prefer to soak received plants for a couple of hours in water before planting, and they sometimes add a mild root stimulator (some brand of vitamin B) or even a pesticide or fungicide as a preventative measure. (An ounce of prevention is worth a pound of cure.) However, many commercial sellers treat plants with pesticides and/or fungicides before they ship. Therefore, before treating new plants with either, you probably should first check to see if it has already been done.
Once a new acquisition has been planted, you should withhold watering for about two weeks. Natural rain is fine - but do not apply supplemental water. Daylilies take up most of their water from fine root hairs. Transplanted daylilies need a little time to redevelop these fine hairs that were damaged when the plant was dug up.
I have heard of a 'trick' to give new roots a jump start. Plant new daylilies (only those shipped bare root) in just sand (temporarily) or sand-amended dirt (permanently). (I mix sand and compost into all of my plantings.) Planting in sand or a sand/soil blend supposedly promotes faster re-growth of these fine root hairs. Additional watering may be required in such cases, especially if planted in 100% sand, but be careful not to over-water; use a meter if you have one. Avoid planting in midsummer to minimize risk of rot.
 home-design-1MULCH
Despite the fact that mulch can foster the growth of slugs and other insects by providing them with an ideal environment, its benefits outweigh its disadvantages. Mulch can be attractive, practical, and environmentally sound. It controls weeds, retains vital moisture, and provides a use for recycled leaf and grass compost.
Sometimes mulch is used for tender cultivars in winter. Beneficial to many varieties, especially during winters of extremes and rapid climate changes, although hardy cultivars do not need it. Some hobbyists use leaves, shredded, whole, or composted. Some use hay or alfalfa (but these can sprout). (I use compost materials that have not completely broken down and out a layer of pine straw on top.) By 'winter mulch', we are talking about covering the ground only around the daylily leaves and crown, not the actual plant.
ImageMapAbout the Daylily
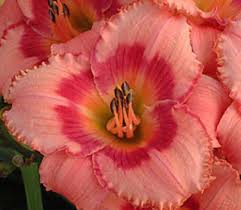
The daylily, or more correctly Hemerocallis, is a perennial plant that blooms primarily in midsummer (earlier in the South; later in the far North). The basic plant is often called a 'fan' because the leaves are fan shaped. This means they are arranged in two vertical rows on opposite sides of the 'crown' or core of the plant, similar to an Iris plant. Thus, the leaves tend to grow in one (flat) geometric plane and take on the general shape of an old-fashioned, hand fan. The plant propagates mainly by expanding its roots, which form new fans. A 'clump' is formed as the plant grows and forms multiple fans.
Each individual daylily bloom lasts only one day. Hence, the name from the Greek, meaning beauty for a day. Not all blooms on a given stalk (called a scape) bloom the same day. Daylilies often send up one bloom stalk per fan. Thus, a clump of multiple fans will also usually produce multiple bloom stalks, and each stalk has multiple blooms. Therefore, an individual clump can produce many blooms in total. And because all buds do not bloom on the same day, the plant gives the illusion that the same blooms last for days, even weeks. However, it is simply a different batch of blooms each day, with a single plant having at least some bloom every day generally over a period of 2 to 3 weeks.
Daylily leaves are long and slender. They are varying shades of green. A few ones may show variegation. Yellow indicates trouble: disease or insect infestation.The size of daylily blooms ranges from 1.5 inches (miniatures) to 8 inches or more (the spider varieties). The most common size is 5 to 6 inches.
Daylilies are hybrids. This means that, unlike some other plants, the seeds will not produce exact copies of the mother plant. Thus, you cannot use seed as a means of duplicating your favorite cultivars. As in humans, when you cross two parents, the offspring will exhibit traits of both, but the children will be unique and may not even look like either parent. Therefore, unless you are intentionally hybridizing, do not let seed pods remain on the scape. You would not be using the seed, and the growth of the pod will needlessly steal energy that could be better used to produce more blooms or new fan growth.
Daylilies are a staple of the summer Southern garden, and with so many colors, sizes and even rebloomers, the hardest thing will be to pick just one or three!
Follow us, like us, share us. We are Sweet Basil Farm & Gardens on Facebook. We are a local Middle Georgia producer of farm fresh fruits and vegetables and members of the American Poultry Association, licensed by the Georgia Dept. of Agriculture as Poultry Dealers and Brokers, and a proud member of the Georgia Grown program, a division of the Georgia Dept. of Agriculture. We also breed, sell and ship poultry, pet pigs, bearded irises and much more. We have an 80 acre working farm, with great emphasis on all natural gardening and livestock management practices. An 1840s general store is situated on our property, and serves as our on-site farmer’s market. We have a large vegetable and herb garden, fruit orchards and more. Conveniently located off of Interstate 75 near the Johnstonville Rd exit (#193).  We are six miles west, located in Barnesville, Lamar County, Georgia.
Special thanks to growingthehomegarden.com for the fantastic blog ideas, daylillies.org for the diagram and helpful information and the beautiful photo credits to Sweet Basil Farm and others found on Google, and to J. David Matthews, of Barnesville, Ga. for contributions with all that I try and test (and need help planting.)

Wednesday, May 6, 2015

Spring Perennial Care Tips from Sweet Basil

In-season mulching

Most perennials benefit from applications of organic mulches during the growing season to retain moisture in the soil and smother weeds during the growing season. Grass clippings, shredded leaves or bark, compost, and other organic materials also improve the soil as they break down.

Watering

While some perennials are drought-tolerant, many need plenty of water. If the soil dries out due to lack of rain, it's important to thoroughly soak the soil when you water, not just wet the surface. It's also important to keep the foliage and flowers as dry as possible to prevent disease. Soaker hoses and drip irrigation do this best. If you use sprinklers, run them in the morning so that the plants dry quickly in the sun. Watering individual plants by hand takes patience to supply enough water to thoroughly soak the soil.

Fertilizing

Most perennials do not require heavy fertilization. You can work in a small handful of low-nitrogen fertilizer (5-10-5, for example) in a ring around the plant in early spring, and perhaps again two more times at 6-week intervals. Fertilize late-flowering plants once more in late summer. Total application should be less than 4 to 5 pounds per 100 square feet. Keep fertilizer off foliage to prevent burning. Use slow-release or organic fertilizers to reduce burning concerns. Organic fertilizer is available at most big box stores, or make your own with compost and other organic matter.

Staking

Some taller perennials tend to fall over, especially when they are heavy with flowers. To keep them upright, you can locate them so other plants help support them, or back them up against a fence or other structure and fasten them with twine. Another alternative is to insert stakes of wood, bamboo, or other unobtrusive material in the soil adjacent to plants while they are still small and, as they grow, fasten the plants to the stake. Be careful to avoid damaging roots. Other commercial products are available to support plants.

Pinching

Some branching perennials respond well to pinching -- removing the growing tips by pinching off the small, developing leaves at the ends of stems. This forces more lateral growth, making the plant bushier and shorter. Aggressive pinching may delay flowering in some species or cause plants to flower at a shorter height. Perennials such as Asters, boltonia, Russian sage, garden phlox, and upright sedums (such as 'Autumn Joy'), as well as annuals of Zinnias, Geraniums, begonias and more  respond well to pinching.

Thinning

This practice helps increase air circulation and prevent disease in perennials, such as garden phlox and beebalm, that are prone to mildew and fungal leaf spots. When these plants are about a quarter of their full height, cut half of the stems to ground level. This can also increase stem strength and flower size. Pruning before flowering You may want to cut back some perennials by 12 to 18 inches in early summer. Prune them before flower buds are set (Azaleas) or, for late-summer or early-fall blooms, after the buds are set but before flowers open. (Caution: With some species, pruning after flower bud set will eliminate flowering altogether.) This will delay flowering and shorten flowering height, so plants are less likely to flop without staking. For example, if you cut back coneflowers in early June, they will bloom until late September. If cut back in early July, they will bloom into October. Pruning after flowering some early bloomers, such as creeping phlox, perennial candytuft, and rockcress, may bloom again if sheared back by half immediately after their first bloom. Many summer bloomers benefit by cutting back to the leaves at the bottom of the plant after flowering. Try this with yarrow, ladies' mantle, shasta daisy, delphinium, cranesbill (geranium), catmint, salvia, and veronica. Depending on species, age, and other factors, other summer bloomers do better with less aggressive pruning.


Disbudding

With some perennials, especially those used for cut flowers such as peonies, Dahlias and chrysanthemums, you can encourage fewer but larger blooms by removing the smaller lateral flower buds, forcing plants to put more energy into the terminal bud remaining at the top of the plant. Or you can remove the terminal bud and encourage more (but smaller) lateral flowers.

Deadheading

Remove spent flowers after blooms start to fade. This keeps the plants from wasting energy on seed production and keeps them looking neat. In some species, deadheading can encourage another flush of flowering. It also prevents perennials that reseed aggressively from spreading where you don't want them. Some of these include Gerbera Daisies, Salvia, flowering onions, columbines, golden marguerite, foxglove, coneflower, feverfew, Siberian iris, and balloon flower. To attract birds to your garden, don't deadhead species with seed favored by birds, such as coneflowers, black-eyed Susans and sunflowers. Deadheading biennials sometimes encourages them to overwinter an additional season. As a general rule, only remove the faded blossom and stem down as far the next healthy blossom or set of leaves. With some perennials, it's best to cut back to the leaves at the bottom of the plant after they are finished flowering.

Deadleafing

Remove dead leaves to make room for new foliage. This improves the appearance and health of the plant. Dead leaves may be natural or they may be a symptom of larger problems. Fall care Cut back most perennials to about 3 inches from the ground. Any closer may damage crowns. Remove debris from the garden to help prevent diseases. Wait until spring to cut back some species, including European ginger, bishop's hat, ferns, Lenten rose, ornamental grasses, and upright sedums (such as 'Autumn Joy'). In addition to adding winter interest, some perennials overwinter better if left uncut. If the growing season has been dry, water deeply in fall before the ground freezes.

Division

Many perennials begin to decline after a few years. They don't grow as vigorously as they did the first few years after planting and they flower less. The center of the clump may appear dead, with little or no growth. When this happens, it's a good sign that the plant is ready to be divided. The best times and methods of dividing perennials varies with species. In most cases, you divide plants when they are dormant, either early in the season before they break dormancy or in fall so that the roots of the new plants can get settled in before the ground freezes. In most instances, you dig out the entire plant, wash the soil off the roots, and cut or pull them apart into several or many pieces. Sometimes this can be quite difficult, especially with older plants and ornamental grasses, requiring the use of shovels, spading forks, or picks. Focus on preserving the newer, more vigorous roots and discard older or diseased parts. Replant the divisions into a larger area than the plant once occupied, using the same spacings and soil preparation that you would use for new plantings. 


If you enjoyed this article, want to know more about this or other related interesting topics, please like and share this article. Be sure to like us, so you don’t miss anything, we are Sweet Basil Farm & Gardens, on Facebook and other social media. We are a local producer of farm fresh fruits and vegetables and members of the American Poultry Association, licensed by the Georgia Dept. of Agriculture as Poultry Dealers and Brokers, and a proud member of the Georgia Grown program, a division of the Georgia Dept. of Agriculture. We also breed, sell and ship poultry, pet pigs, bearded irises and much more. We have an 80 acre working farm, putting great emphasis on all natural gardening and livestock management practices. An 1840s general store is situated on our property, and serves as our on-site farmer’s market.Fresh garden vegetables, fruit nuts, eggs and flowers straight from the garden to you. We pick during the week, YOU pick available on Friday and Saturday. Conveniently located off of Interstate 75 near the Johnstonville Rd exit (#193).  We are six miles west, located in Barnesville, Lamar County, Georgia.
Special thanks to the gardening department at Cornell University for a great publication, as well as contributions from J. David Matthews, of Barnesville, Georgia in preparation of this article. Photo credits to landscapenashville.com.